System Recovery Windows 7: Professional Tool
Windows 7 recovery disk can save your time and, perhaps, money in many situations from restoring your Windows after crash to migrating to another drive to giving a damn response to some ransomware by just restoring a clean copy of a system.
Experience the Disaster Recovery utility from Handy Backup!
Version 8.6.2 , built on April 17, 2025. 118 MB
30-day full-featured trial period
Windows 7 Professional Recovery: Advantages of the Disaster Recovery Tool
Independent
The Disaster Recovery creates a USB drive as Windows 7 recovery media. In addition, you can have a Windows 7 recovery disk image either on this USB drive or somewhere else (assuming that this “somewhere” has a connection to a computer where you will run a recovery Windows task).
Convenient
Among system recovery tools for Windows 7 the Disaster Recovery provides all that you need for professional-level recovery: a graphical interface in Windows style, the disk partitioning utility and the comprehensible task creation system for controlling all aspects of Windows 7 recovery tasks.
How to Make Windows 7 Recovery Disk with Handy Backup
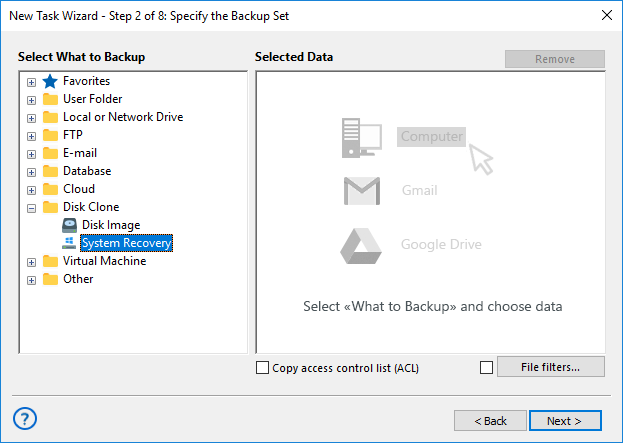
To create a Windows 7 recovery media, you must use a scratch or spare USB drive where you will install the Disaster Recovery tool. You can use the Disaster Recovery to create a Windows recovery disk image, or utilize either System Recovery or Disk Image plug-in from a program itself to make one.

Using the Disaster Recovery Utility as System Recovery Tool for Windows 7
To restore a Windows 7 drive image created by Handy Backup, you will need to make a recovery task and configure it properly. To create a task, follow the next instruction:
- Run the Disaster Recovery from a USB drive.
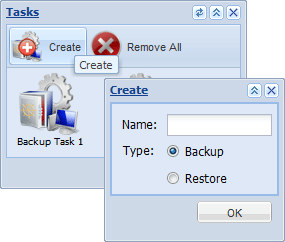
- On the desktop, open the Tasks.
- Click New Task on the toolbar. It will open the New Task dialog.
- In the dialog, enter a name for a task into Name field.
- Select the type of task as Restore.
- Now click OK. You will see a task window.
- On the desktop, open the My Computer object.
- Browse for the Windows 7 recovery disk file.

- Drag-and-drop this image file into the What to Restore folder on the task window.
- Now return to My Computer. Double-click the physical drive for restoring an image from a Windows 7 recovery media.
- To execute the task, click Restore on the toolbar.
Other Tools for Computer Recovery of Windows 7 Data
In addition to the Disaster Recovery utility, Handy Backup provides some other system recovery tools for Windows 7:
- Registry recovery. Restoring the data from saved Windows 7 registry.
- User folders and libraries recovery. This option recovers the Windows 7 user files.
- File and folder recovery. You can simply recover any files and folders from Windows 7, including the Program Files, Program Files (x86) and %APPDATA% folders.
Version 8.6.2 , built on April 17, 2025. 118 MB
30-day full-featured trial period
Among system recovery tools for Windows 7, Handy Backup and the Disaster Recovery utility have one of most flexible, convenient and secure sets of functions and options!
