Bare Metal Restore for Windows 11, 10, 8, 7 and Linux
Bare metal recovery allows bare metal disaster recovery onto once non-system drives, including new disks or completely new computers. Handy Backup can serve as perfect bare metal backup software, allowing recovering from files taken by the program with the dedicated Disaster Recovery tool.
When You Need for Bare Metal Restore?
Moving Your System or Data Drive to another Hardware
If you are replacing your hard disk or a whole machine to a roughly equivalent unit, you may feel a need to make bare metal backup Windows and then to transfer it onto this new hardware.
Restoring Your Drive after Some Disaster
If some mishap or trouble strikes your machine, and you are repairing or replacing a hard drive, make the bare metal recovery to reset all your data and settings into the place.
Cloning or Mirroring OS
Sometimes, this is a need to make some clones of your OS (for example, to multiply a pre-configured Ubuntu Linux onto many laptops). The bare metal recovery can help you there!
Windows Backup Bare Metal Recovery Considerations
Windows is a proprietary OS, and each copy of Windows tunes up itself to some hardware. Therefore, please take some considerations into account when performing Windows bare metal restoration:
- Do not use bare metal backup Windows files to take unlicensed clones of Windows!
- Some hardware can be in conflict with a copy of Windows moved to another machine, when other still can work without problems.
- Transferring bare metal recovery copy to other hard drive often brings no problems, although you must check that a new drive has enough capacity to store a system!
The last statement can be crucial, as a typical Windows 10 bare metal backup (including all programs installed, user libraries and so on) can take from 50 to 200 GB and more, so always check out your storage drive capacity before attempting restoring an image!
How to Make Bare Metal Restore with the Disaster Recovery Tool?
Firstly, check that you have all you need to perform bare metal recovery.
- The Disaster Recovery utility. You can obtain it freely from Handy Backup (for users of all editions except Standard and Free for Cloud).

- A USB drive with a copy of this bare metal backup software, which you make from the program during installing the Disaster Recovery tool.

- A copy of your Windows, Linux or data drive, taken by bare metal backup or by Handy Backup itself, to restore on a scratch hard drive.
- An empty or scratch hard drive or a computer containing it to perform bare metal recovery.
Bare Metal Recovery Sequence
Load a target computer from a USB device containing the Disaster Recovery utility and your hard drive copy file. After booting up, you will see the Disaster Recovery desktop. Now please follow the next sequence of actions.
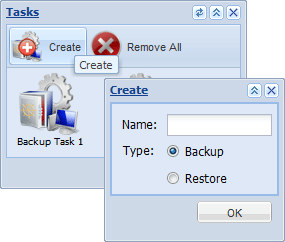
- Open the Tasks window by clicking twice on the icon.
- On the toolbar, click New Task. You will see the New Task dialog window.
- Here, specify a name for a task in the Name field.
- Select Restore task type.
- Click OK. You will see the task window for this task.
- Return to the desktop and open the My Computer by double-click.
- Open the drive corresponding to your USB flash with a disk image.
- Browse for the file containing a disk image that you want to restore.

- Drag-and-drop the image file into the What to Restore folder in the task.
- Now return to My Computer and double-click onto your primary hard drive as a target for bare metal recovery.
- Drag-and-drop full drive image object into the Where to Restore folder of the task.
- Now click Restore on the toolbar to run your task.
Video Titorial: Bare Metal Restore for Windows 10,8, 7
This video tutorial will help you set up a backup of a Windows drive image using the Disk Handy Backup plug-in for disaster recovery!
Note: Instructions in this material suggest that you already have Handy Backup installed on your PC. If you still haven’t done so, don’t hesitate to download it
