MODX: Backup Database for Websites
MODX backup is a complex thing, due to typical diversity in CMS data representation. Despite that, Handy Backup allows making MODX backup and restore without extra efforts, using only standard plug-ins and tools for making an effective task to save MODX data.
Version 8.6.2 , built on April 17, 2025. 118 MB
30-day full-featured trial period
What you Get with MODX Backup and Restore Software?
Organization and Automation
All procedures, from simple MODX database backup to regular mirroring of a CMS to synchronizing between two website clones, in the one and unified solution for any MODX backup operations!
Security and Reliability
Handy Backup does not open internal structures to backup MODX website content. Instead, it copies static and dynamic data on a basic, FTP or DBMS level, allowing taking any security precautions!
Advanced Controlling Options
Compared to classical scripts or utilities like phpmyadmin, Handy Backup contains all the features guided under the one intuitive GUI, which is extremely easy to use even for an unskilled person!
Organizing MODX Backup
The three parts of a CMS backup task are saving static data and keeping dynamic content, and, finally, merging MODX backup actions into a single task. To create such task, please follow the instructions provided below.
Part One: Making a Task to Save MODX Data from Static Content
To save static content of MODX websites, you must use an FTP, SFTP or FTPS servers where MODX stores this content. Create a task to connect an FTP service and download data.
- Open Handy Backup and make a new task by selecting a menu item or clicking on the button.
- On the Step 1, select a backup task and click "Next" to proceed.
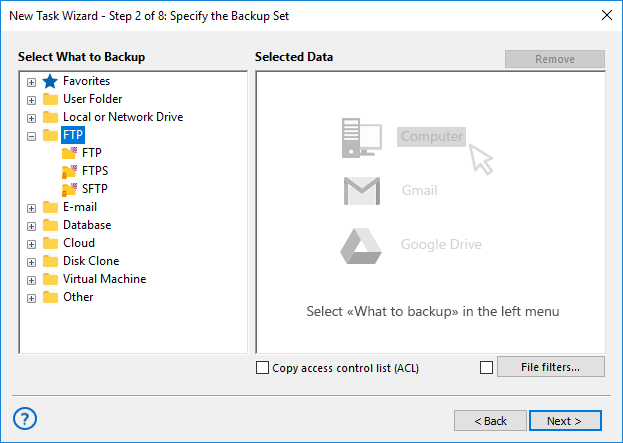
- On the Step 2, open the FTP data group on the left panel.
- Double-click onto the name of an appropriate plug-in (i.e., FTP, SFTP or FTPS).

- In the new "Select data..." window, double-click on the "Create a connection" string.
- Enter the FTP connection parameters, i.e., FTP server name, port, user name and password.

- Give a name for this connection. Click OK to close a connection dialog.
- Now double-click onto a connection name. You will see a list of your MODX static data.
- Mark checkboxes against names of files and folders that you want to back up.
- When finishing, click OK. Return to the Step 2. You have selected static data!
Part Two: Creating MODX Backup Database
The next phase is making MODX backup for dynamic data. Do not create a new task (unless you are planning to separate static and dynamic MODX backup). Instead, on the Step 2 do the next things:
- Select an appropriate database plug-in from the "Database" group on the left.
- Double-click on this plug-in and in the new window, create a connection just as above.

- On the connection dialog, enter the database access parameters, according to your DBMS.
- Click OK. In the "Select data..." window, mark checkboxes against MODX backup data.
- Again, click OK and return to the Step 2 window.
Final Actions: Task Setup
After choosing MODX backup data, all you need is to place copies of these data correctly, keeping all actions in the most automated way you can. With Handy Backup, you may rely on the following things:
- On the Step 3, select storage for your MODX backup and restore actions.
- Handy Backup allows using local storage such as hard drives and external drives.
- You can also use local network storage solutions, like NAS/SAN or FTP/SFTP/FTPS.
- Finally, you can use cloud services (backup to S3 cloud, Google Drive, OneDrive, Dropbox etc.).
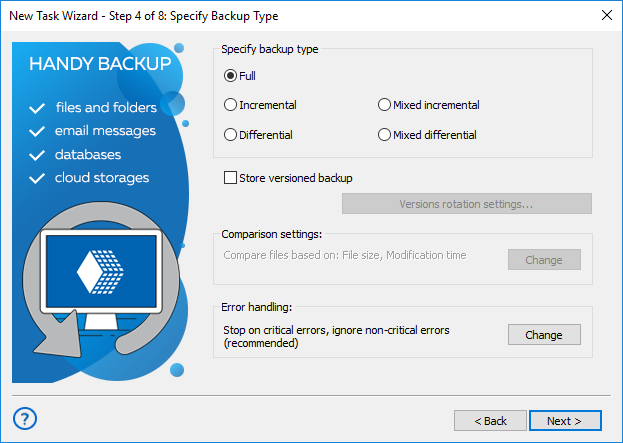
- On the Step 4, you can set up a full or partial backup (incremental, differential or mixed).

- Partial backup allows saving backup time and storage space used for keeping data.
- Mixed backup consists of a pre-programmed cycle of full backup and partial backups.
- You can also keep some versions of a backup dataset simultaneously, with time stamps.
- On the Step 5, compress and encrypt your backup data if you need it.
- Besides these options, Handy Backup provides automatic encryption for transferring data to online vaults if a storage API allows such option.
- Note that Handy Backup stores uncompressed and unencrypted data in original formats, allowing browsing, viewing, modifying or even restoring these data manually.
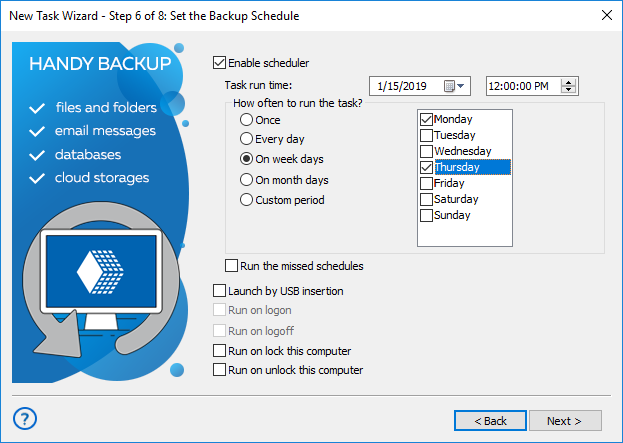
- On the Step 6, schedule your MODX backup task to run at an exact time and repeating period.

- You can also trigger a backup task to run by some system event.
- Do not forget to force re-running missed tasks unless you have reasons to skip it.
- On the Step 7, you can run other software before and/or after a task (e.g., to stop MODX.).
- You can use this for "cold" backup: stop a MODX CMS, save data and restart MODX.
- In addition, this option allows running batch files, using external encryption etc.
- Finally, you can give a name for your task and run (or not run) it immediately.
That is all! A new task will back up your MODX websites without any need for further interference!
Video Example
Website backup is a quite simple procedure. Just follow next action sequence to take a result.
Note: Instructions in this video suggest that you already have Handy Backup installed on your computer. If you still haven’t done so, don’t hesitate to download it.
How to Restore MODX Data
You can also make an automatic MODX recovery task. To do it, please create a new task as described above, and select a restore task type on the Step 1. Then do the next actions:
- On the Step 2, find a file called backup.hbi in the selected vault containing your MODX backup.
- Select this file and click "Next". To simply restore MODX data, you may click "Next" until finish.
- If you need to clone MODX websites, click the "Change Location..." button on the Step 3.
- In the new location dialog, choose a place to restore MODX data.
Note: For static data, the new place must be a sort of an FTP server; for dynamic data, this must be a database server connected to MODX and based on the same DBMS as original data!
Version 8.6.2 , built on April 17, 2025. 118 MB
30-day full-featured trial period
Make MODX backup and restore with Handy Backup! Try it just now by downloading a free 30-day full trial version!
