Step 2: Specify the Backup Set
This page describes the second step of creating a backup task with the New Task Wizard.
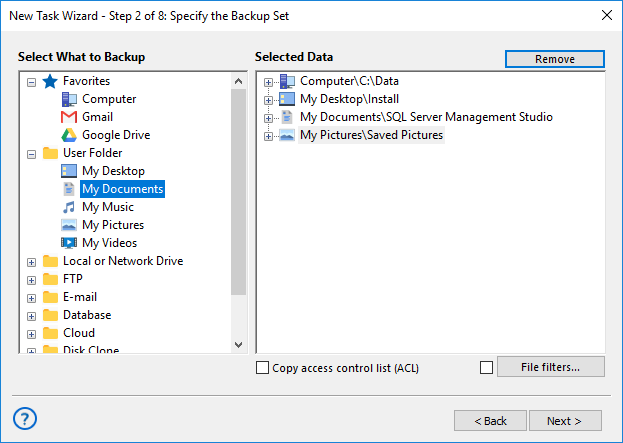
On the second step of the New Task Wizard, you need to select data that you want to back up. The window consists of two panes: Data Sources and Backup Set.

- In the Data Sources pane, you can see the list of all different types of data that you can back up. For example, if you want to back up computer files and folders, you need to select Computer.
Technically, data sources are plug-ins. To make use of this or that plug-in, you need to have an appropriate license. During the trial period, you can use all plug-ins without any limitations. After registration, the list of plug-ins will be limited, respectively to the edition you register. To learn more, please refer to Registration...
Some of the plug-ins are configurable. For example, to back up a MySQL database, you will need to create a MySQL configuration (specify server, login and password). To learn more, please refer to Plug-in Configurations...
- In the Backup Set pane, you can see the list of paths added to backup. It is recommended to create individual tasks for each logical group of data that you want to back up. For example, to back up a website, you may want to select an FTP folder and a MySQL database.
Note: In this dialog, data is accessed through a Workstation (logical component responsible for retrieving, storing and processing data) that is launched from a specific user account and may be unable to access some data. For example, the Disk Image plug-in requires the Workstation to be launched with administrator privileges. To learn more, please see Workstation.
Selecting Data for Backup
To add data to backup set, follow these steps:
- (Server edition only) In the dropdown menu at the top left corner of the window, select Workstation that you want to back up.
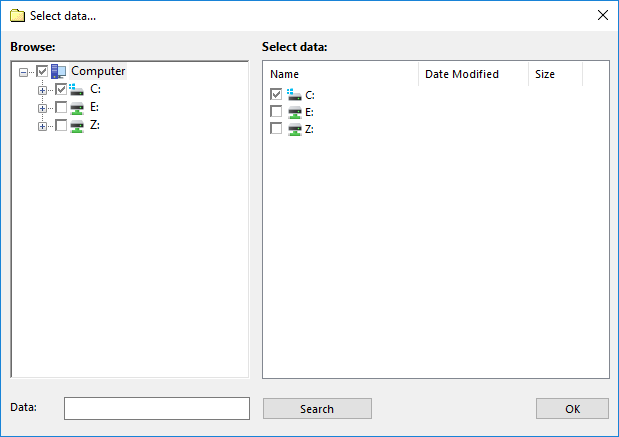
- In the Data Sources pane, select a plug-in and click on its name. The Select data... dialog opens.

The Select data... dialog shows what you can back up from the selected source. All data is presented as files and folders that correspond to different objects available in the data source. For example, files and folders of the Computer plug-in are common file system objects, while for MySQL plug-in, folders are databases, and files are database tables. To learn more, refer to Plug-in File Systems.
Note: Selecting all objects in a folder is equal to selecting the entire folder. In this case, folder path is added to Backup Set without any information about its child items. All future files that may appear in the folder, will be backed up too.
- In the Select data... dialog, check the boxes next to files and folders you want to back up. Left pane of the window displays folder tree view, and right pane displays contents of the folder selected in the left pane. You can do the selection in both panes.
- When finished the selection, click OK. Selected data appears in the Backup Set pane of the New Task Wizard.
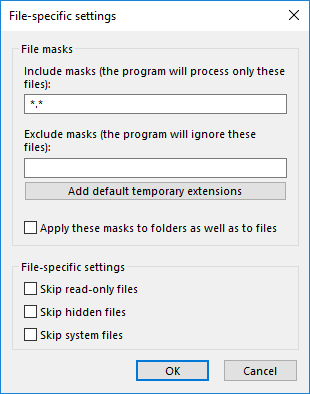
- (Optional) Click the File filters... button below the Backup Set pane to set up filtering. The File-specific settings dialog opens.
In the File-specific settings dialog, you can specify filtering options that will be checked for each file backed up.

Include and Exclude masks: Filling out these fields enables you to back up only files matching to a specific file mask. Use * (asterisk) as a wildcard, separate different masks with | (vertical line). For example, *.avi|*.mp4 will select files with any names and AVI and MP4 extensions only.
- When finished with adding data to backup set, click Next.
Removing Objects from Backup Set
You can remove only root items of backup dataset (not a part of backup). To remove an object, do the next things:
- Select a root data item in the right pane.
- Click the “Remove” button above.