Hyper-V Plug-in
Using a "Hyper-V" feature, you can save any number of Hyper-V virtual machines from one physical node. This is no need to install a copy of Handy Backup into a machine to make this plug-in works.
The Hyper-V plugin supports only server versions of Windows (Windows Server 2022, 2019, 2016 and 2012).
Before the Backup
It is to be mentioned the specialized Hyper-V servers have no GUI to operate with standalone editions of Handy Backup.
- Therefore, the most convenient way to use Handy Backup and a Hyper-V tool is to install a Network Agent on a Hyper-V physical server, linked to a Management Panel somewhere else.
- Starting from Handy Backup 7.7.7, you have a capability to install a standalone edition of Handy Backup on a Hyper-V host and set it up using a standard GUI.
Note: For any practical purposes, backup from standalone is almost identical to the process described here. Just skip the selection of a remote machine.
Backing up Hyper-V Machines
To save a copy of these data, use the following sequence:
- Create a new backup task.
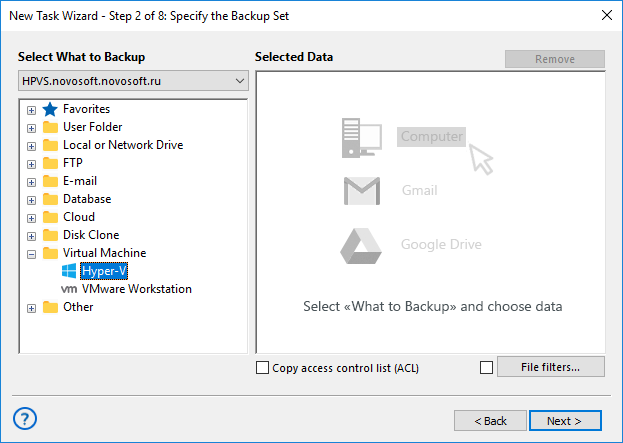
- On a Step 2, choose the "Hyper-V" feature on the left panel. Click on a machine server name appeared on the right.

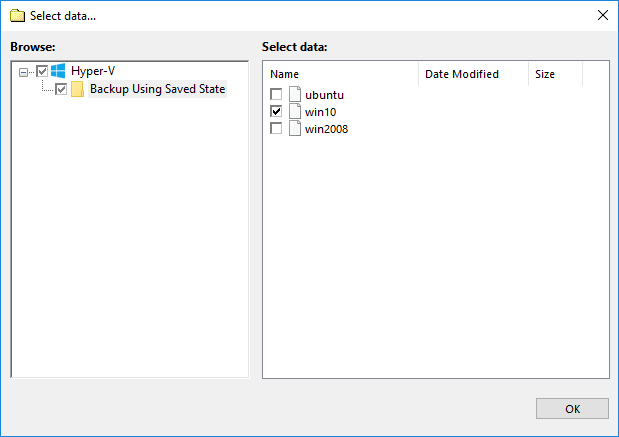
- A new window will appear. Select any virtual machines you will plan to back up with the new task.

Note: this plug-in makes snapshot of particular virtual machines, not of entire arrays. To back up all Hyper-V machines on the server, please select them all, not just mark a "Hyper-V" on the left panel.
- Press "OK" when you finish selecting data, returning to the task creation window.
- Now you may select where your backups will be placed.
- Set up other task parameters, such as encryption and compression; choose the backup type, control pre- and post-actions within the task, etc.
- Finish the task creation wizard. Your Hyper-V backup task is ready to use.
Restoring Hyper-V Data
At present, you can only restore backups made with the Hyper-V plug-in only to their original locations. Because of this, the process of restoration is very straightforward:
- Open a New Task Wizard. Select Restore task, and then click Next.
- Browse for the index file (backup.hbi) located in the destination folder. Select it, and then click the "Next" button.
- Skip the Select Restore Locations dialog by clicking Next (as there is no way to restore data to a different location).
- Skip the next steps by clicking Next, until you finish the task creation.
Before running a Hyper-V recovery task, you must stop all current instances of Hyper-V machines and all Windows services depending on it. After a task will complete, re-launch the services by some method that you see the most appropriate.
Read more about Hyper-V Backup Software features.
Related page: Backup Server Software