Manual Installation of Network Agents
The manual installation of Network Agents provides an option of manual control over all aspects of installation and configuration of any Network Agent on a particular machine.
Causes for Manual Installation
You can have a need for configuring and installing Network Agents manually in some cases including:
- If some troubles emerge when configuring an Agent for a particular machine automatically;
- When you set up a remote Network Agent in a quite non-typical network architecture;
- To achieve an access to Linux-based remote machines;
- For fine-tuning some extra options such as using proxies and bridges, firewalls or other similar software.
For all these cases, you can install and configure your Network Agents manually. Read the next sub-chapters for taking detailed instructions about the manual installation and setup.
Selecting Installation Type
You can install Network Agents on remote machines by the two ways: locally or in a centralized mode. This chapter is about a local installation procedure. Please refer to the corresponding chapter for instructions describing a process of centralized installation.
Installing a Network Agent
To install a Network Agent, follow these steps:
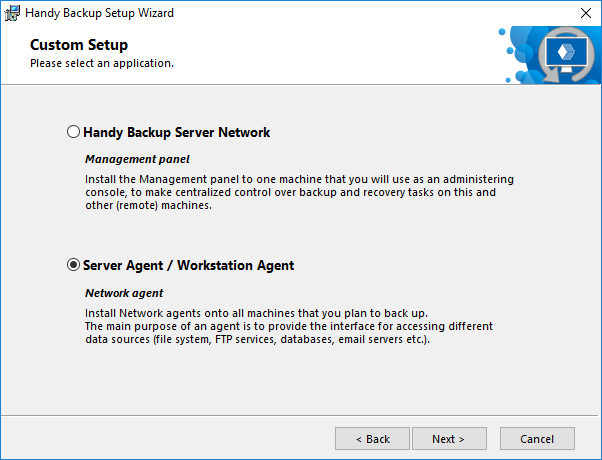
- On the Custom Setup step of the Setup Wizard, select the "Server edition" option, and then click the Next button.
- On the next screen, select the "Server Agent / Workstation Agent" option and click "Next".

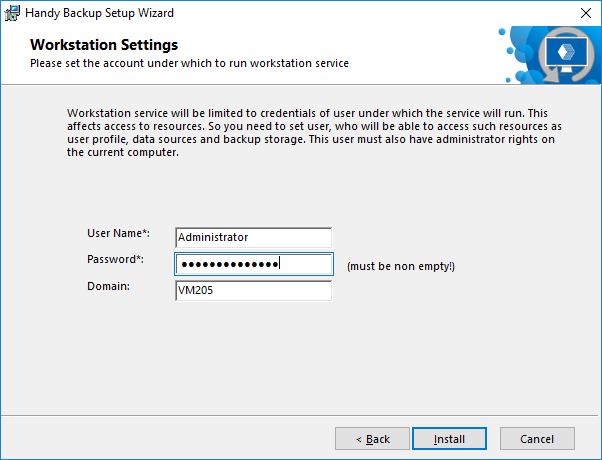
The Network Agent Settings window will appear.
- On the Network Agent Settings step, select user account under which Workstation will be installed.
Network Agent is always launched from a certain user account, and allows backing up data that can be accessed by this user only.
- Local System – use this option to run the Network Agent from the SYSTEM account, i.e. you won′t be able to back up Windows Libraries, Outlook and other user-specific data.
- Custom Account – use this option to run the Network Agent from a specific user account with its own access rights and privileges.

- Click Install to start the installation.
- If you have User Account Control enabled, then you will be prompted to confirm the installation. Click Yes.
The program is installed on your computer.
- On the final screen of the Setup Wizard, select if you want to see the Readme file with brief description of the program′s features.
- Click Finish.
After the installation, you will need to configure the Network Agent, so it can register on a networked Management Panel of some network edition, and allow it to access its data. Please see the next chapter for details.
Technically, the file workstation.hbl is a common XML file in which all parameters are available in a simple and readable form.
Entering settings manually
Related pages:
- Open the Network Agent settings file (C:\ProgramData\Novosoft\Handy Backup 8\Users\[username]\Settings\workstation.hbl) with any text editor.
- Find and modify the WorkstationHost parameter:
‹param name="WorkstationHost"›localhost‹/param›
and instead of localhost, insert the IP of the machine on which the agent is installed.
- Find and modify the CoordinatorHost parameter:
‹param name="CoordinatorHost"›localhost‹/param›
For example, if your Server is located at 192.168.1.100, you need to change it as follows:
‹param name="CoordinatorHost"›192.168.1.100‹/param›
- Restart the Network Agent.
To restart the Network Agent, go to Windows services, find a service named Handy Backup Network Workstation 8, and restart it.