E-mail Notification
By default, to monitor the status of your tasks, you must open the program's main window and locate them in the Task View pane. For added convenience, you can receive notifications about task results via email. This feature is specific to each task and needs to be enabled individually for every task. For more details, please refer to New Task: Pre-, Post-Operation Actions.
Email notifications are sent by the Server component of the software. In the settings, you need to specify the parameters of your mail server, including the sender, message template, and more.

To enable email notifications, please follow these steps:
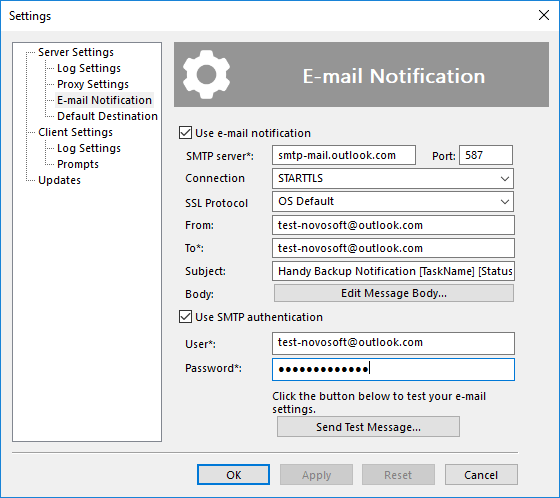
- Check Use email notification and complete the following fields:
- SMTP server: The mail server used to send emails.
- Connection: Defines the type of connection to the SMTP server. Determines whether encryption will be used and how it is established.
- Plain Text: A connection without encryption. Can be used in cases where the SMTP server does not support secure protocols or when operating within a trusted local network. However, when transmitting data over public networks, potential security risks should be taken into account.
- SSL, TLS or DTLS: Establishes a secure SSL/TLS connection immediately. Select this option if the SMTP server requires encryption from the start of the session.
- STARTTLS: Starts as an unencrypted connection, then upgrades to a secure TLS connection (if supported by the server). This option is considered the preferred choice for most modern mail servers, as it offers a high level of security along with broad compatibility.
- Auto Upgrade to STARTTLS: Attempts to automatically detect if STARTTLS is supported. If the server supports it, the connection will be encrypted; otherwise, a plain connection may be used. Suitable for maximum compatibility with different server configurations.
- SSL Protocol: Specifies which SSL/TLS protocol version will be used to protect the connection with the mail server. The value should be selected according to the settings and requirements of your SMTP server. Available options:
- OS Default: The protocol is selected automatically based on the operating system’s current configuration and security policies. This is a convenient and universal choice.
- SSL v2: One of the earlier versions of the SSL protocol. Used if the server specifically supports this version.
- SSL v2 or SSL v3: Allows connection using either of the two protocols, depending on what the server responds with.
- SSL v3: A later version compared to SSL v2. Used if this protocol is required by the server.
- TLS v1.0 or TLS v1.1 or TLS v1.2: Automatically selects one of the three TLS versions based on what is supported by the server. Often used for compatibility with a variety of systems.
- TLS v1.1: Establishes the connection using only TLS version 1.1.
- TLS v1.2: A modern version of the TLS protocol, widely supported by most email servers.
- From: Enter the same email address as in the "User" field below.
- To: One or more target email addresses where you wish to receive notifications.
- Subject: The subject of the email.
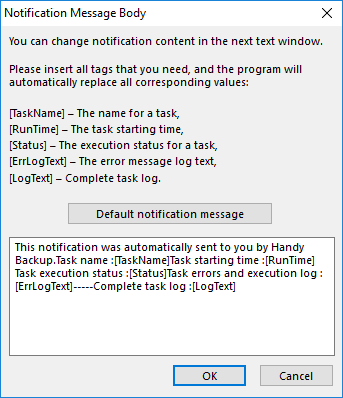
- Body: Click Edit Message Body to modify the welcome message, signature, etc.
Note: If you are unsure of the exact parameters for your SSL protocol, set this option to "OS default." Modify this value only if you know you need to change this parameter!
Note: On operating systems earlier than Windows 8, the ability to use international email addresses (i.e., those containing Unicode characters) is disabled.

- Check Use SMTP notification if your SMTP server requires authentication. Enter the necessary information in the User and Password fields.

Gmail. Sign in to your email account and set up an app password for Handy Backup according to the instructions on the support page.

Yahoo Mail. Create an app password according to the instructions on the Yahoo Help page.

Outlook. Go to your email account and set up two-factor authentication following the instructions on the Microsoft support page.

Zoho Mail. Access your account and generate an app password by following the instructions on the Zoho Help page.
- Click Send Test Message to verify that all fields are configured correctly.